Scribble Gets Acquainted With A Modern PC
When I designed Scribble’s electronics, I chose to use the ATmega’s built-in UART to communicate with other machines. The reasoning is simple:
- UARTs only need three wires to make a serial link
- UARTs are robust and flexible
- UARTs can connect to modern and retro hardware using well-known protocols
- UARTs are relatively cheap and easy to get your hands on
Given the constraints implied by the ATmega, this represents the best overall compromise. This is why UARTs, despite being over 60 years old, are still the best solution to a lot of computer communications problems. Sometimes old stuff stays around for a good reason.
Getting serial I/O up and running is exciting because it’s what makes Scribble work on it’s own. From here it’s a surprisingly short hop to the final HP-GL interpreter. Even as it is now, Scribble is quite capable of drawing complex shapes without human intervention.
Part of the Scribble Pen Plotter Series:
Scribble Serial Communication I/O Software
UARTs vary considerably in complexity. Some have all kinds of built in features like automatic flow control and buffers for increasing throughput. Others do little more than the absolute minimum they can get away with.
ATmega UARTs (indeed most if not all microcontroller UARTs) are unfortunately in the latter category. That means we have to do a lot of work simulating these things in software. While I’m clearly only talking about the ATmega here, this stuff is generic enough to apply to just about any UART.
UART Setup
Before starting any further programming, we need to have both sides of the serial link agree on common settings. UARTs are not able to auto-config on their own, nor is software to do so trivial.
I ended up choosing 9600-8N1 as the agreed upon common settings. Going faster is pointless since Scribble is severely constrained by the speed of it’s output. Playing with the other settings is just as pointless since nothing even remotely modern will use anything other than 8N1 for a simple point-to-point link.
Only a handful of registers must be tweaked to set up the ATmega UART:
	//Set up the UART to 9600-8N1
	UCSR0B = 0b10011000; //Enable RX interrupt, and enable recieve/transmit circuits
	UCSR0C = 0b00000110; //Enable 8-N-1 UART frames
	UBRR0  = 51;         //9600 @ 8MHz
UBRR constant calculated via this lovely tool, though it’s pretty easy to do manually.
From what I’ve seen, pretty much all UARTs are effectively identical here. These settings should be highly transferable between equipment.
FIFO Queue
Since the ATmega does not implement a queue in hardware, a software equivalent must be used. This is required partly because Scribble needs to work with multiple input bytes anyways, and partly because Scribble is slow compared to even a slow serial link.
Queues are well trod “my first data structure” projects. I’ll not discuss them in detail. Suffice it to say I’m using a standard circular queue with minimal customization.
Deciding on the size of the queue is far more critical. Scribble is going to have an HP-GL interpreter. Try as I might, I cannot find any maximum length for HP-GL instructions. You have to treat them as a continuous stream. Scribble requires at most a five digit number token, plus a sign character, plus the terminator/separator. Numbers come in XY pairs, so to maximize throughput a 16 character input queue sounds about right. The next XY pair can stack up in the buffer while Scribble is busy with the last pair.
Of course, that’s only a lower limit. I’d like to increase the input queue after I have a good idea how much RAM the rest of Scribble’s software uses.
I deliberately designed the software so that a queue can be added to the output, so that several steps can be calculated in advance. In practice this isn’t all that useful. I won’t be bothering with an output queue, though I may choose to experiment with one later.
XON/XOFF Flow Control
A problem that will inevitably crop up is when Scribble is unable to accept new input, probably because it’s still executing the last instruction. This is a well-solved problem known as flow control.
ATmegas don’t have hardware flow control signals (though you can sort of bitbang them) nor does Scribble’s physical interface support them. That means we fall back to XON/XOFF flow control.
XON/XOFF works by reserving two tokens that tell the devices when it’s safe to send new data. Any two tokens would work, but the model 33 Teletype decided to use ASCII’s DC1/DC3 characters. Everyone else just kind of copied that from then on. You know how it goes.
After tangling myself into a software knot, I decided to use a very simple line-based protocol for the test. After receiving a valid command, Scribble shuts the serial port down using XOFF. Once it’s done XON is sent to get the next instruction. I can get away with this because the test instructions have a finite length. When I switch to HP-GL that won’t work.
//Flow control constants
#define XON  0x11 //DC1
#define XOFF 0x13 //DC3

/*==========
UART Interrupt
Put new byte in queue
Send XOFF when necessary
==========*/
ISR(USART_RX_vect){
	uint8_t newDat = UDR0;

	//Strip out the non-printing chars, then add to queue
	if((qFull(&inQueue) == 0) && (newDat > ' ')){qAdd(&inQueue, newDat);}
	else{UDR0 = '@';} //Feedback for when something goes wrong

	//At end of command, send XOFF to pause serial communications
	//XON is sent when current instruction is finished
	if(newDat == ';'){newComm = 1;UDR0 = XOFF;}

}
XON/XOFF has a few downsides, mostly concerned with the fact that the tokens are in-band. Depending on the time it takes to get a token through to the other end, there is a risk of data loss. Plotters are slow enough this doesn’t really matter. The other problem is when flat binary is used instead of characters, a problem Scribble avoids by using ASCII.
Glue Code
When testing the manual input, all I had to do was mask out buttons and do some conditional tests on top. Serial input requires quite a bit more work. Pulling parameters out of a character string is pretty complicated. This is a pretty shoddy attempt, though it’s much better than my first clumsy steps. As always, I don’t see the point in doing too much for for a temporary hack that is only used for testing.
Drawing a line between two arbitrary points is surprisingly complex, so I won’t be getting into that just to test the serial I/O. Instead, a custom not-quite HP-GL syntax is used:
X,Y,P;

X- Number of X steps
Y- Number of Y steps
P- Solenoid power
,- Value separator
;- Command separator
Values are the number of steps the motor takes. Omitted values are zeroed or left at their last setting. Negative values are prefixed with ‘-‘. Steps are executed concurrently, so 50,50; will draw a diagonal line. No interpolation happens though, so 100,50; will draw an XY diagonal line that turns into a straight X line after 50 steps.
	//Primary program loop
	while (1){
		//Temporary instruction interpreter
		//This test program is extremely brittle, and probably won't tolerate any misformatting!
		//Format: X,Y,P; Values in decimal
		xCount = 0; yCount = 0;

		//Spin on queue empty
		while(0 == newComm);
		setLED(LED_RUN);

		xCount = atoiFromQueue(&inQueue);
		if(qPeek(&inQueue) == ','){qRemove(&inQueue);}

		yCount = atoiFromQueue(&inQueue);
		if(qPeek(&inQueue) == ','){qRemove(&inQueue);}

		//Solenoid var sets newStep because it must happen before motor movement
		//Dealy added because solenoids are SLOW
		if(qPeek(&inQueue) == '1'){step.solPwrP = 1;step.newStep = 1;_delay_ms(250);}
		else if(qPeek(&inQueue) == '0'){step.solPwrP = -1;step.newStep = 1;_delay_ms(250);}
		else {step.solPwrP = 0;}

		//Skip forward to the ';' at the end
		while(qRemove(&inQueue) != ';');

		//Calculate motor steps. No interpolation for now.
		while(xCount != 0 || yCount != 0){
			while(step.newStep > 0);

			if(xCount > 0){xCount--;step.xStep = 1;}
			else{if(xCount < 0)	{xCount++;step.xStep = -1;}}

			if(yCount > 0){yCount--;step.yStep = 1;}
			else{if(yCount < 0)	{yCount++;step.yStep = -1;}}
			step.newStep = 1;
		}

		//Clear the semaphore, restart serial communications
		newComm = 0;
		UDR0 = XON;
		setLED(LED_IDL);
	}
Much hoop jumping was required to get the queues, instruction formatting, and atoi() calls to cooperate. This “interpreter” is extremely brittle and won’t hold up to much abuse.
Testing Scribble’s Serial I/O
The good news is that Scribble uses an ASCII based protocol that requires no fancy control characters or dodgy workarounds. Instructions are human-readable. All you really need is a standard serial terminal.
On the downside, I have to do quite a lot of manual calculations to get something vaguely Scribble compatible. Well, there had to be some tedious busywork in this project somewhere.
Designing the Test Program
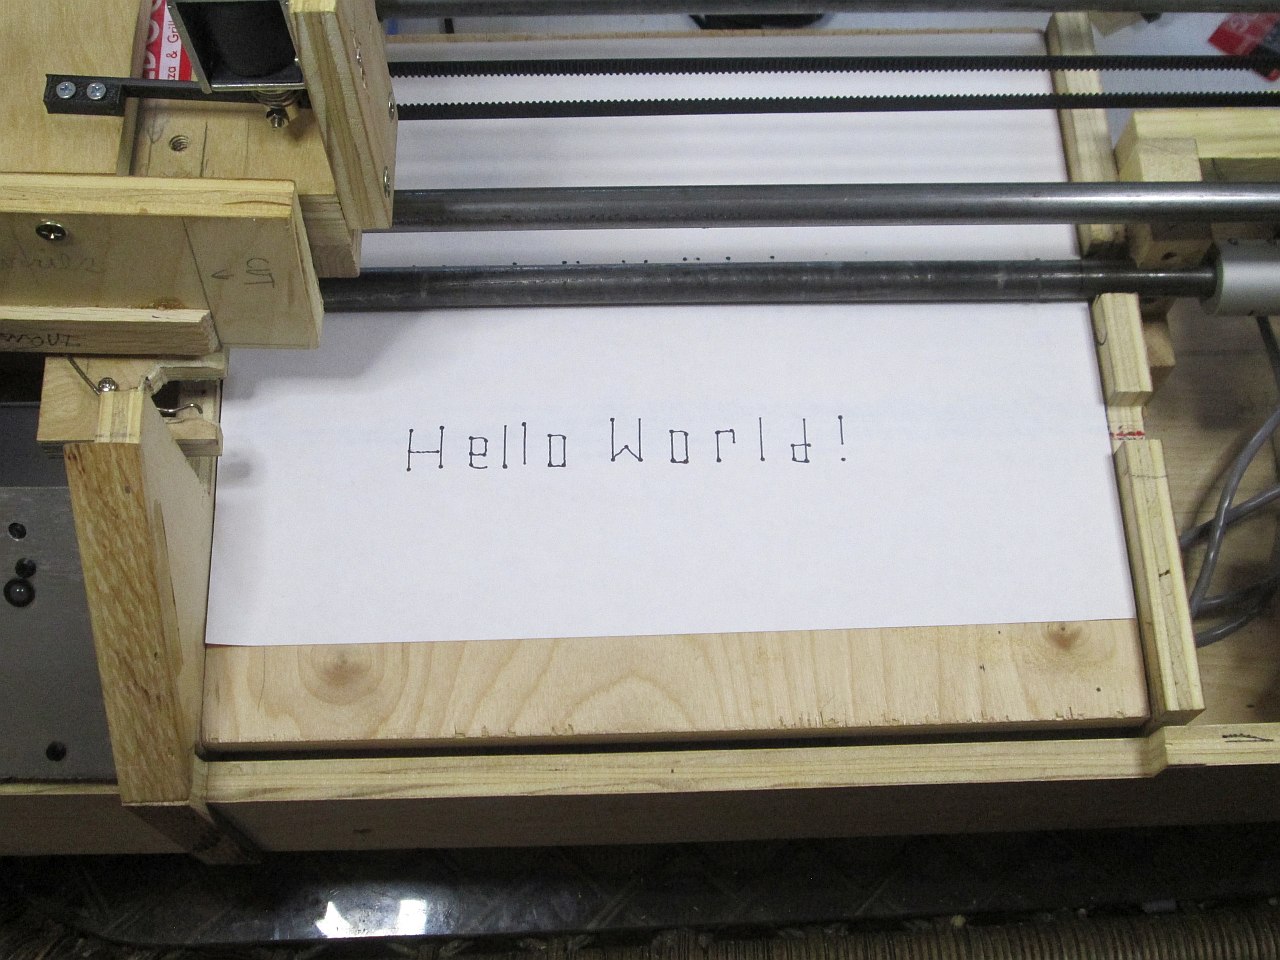
Since the output is now computer controlled, I have to do quite a bit of work to get a machine readable program from my own hasty drawings. Right now Scribble can’t draw true lines. Only simple eight-way movement is possible, like an old arcade stick.
First, I grabbed some grid paper and started drawing up the test image. Nothing fancy, just “Hello World” in chunky rectangular letters.

This wasn’t my first attempt, but it was the first one that worked. Lots of easy to overlook details that make-or-break the whole thing.

I had several test messages in mind. I went so far as to design this entire font sheet. Excessive manual labor dissuades me from doing any more messages this way.
Since I know how many steps each motor takes to move one grid space (1/4″ if you’re curious) I can then calculate how many steps each motor must take to draw each line in each letter. This is roughly the equivalent of “hand assembly” for plotters.
Calculating all these offsets is tricky and error prone. I don’t expect a smash out success for the first run. (Spoiler: it took dozens of tests to get something worth showing).
Automating this process would be of similar complexity to writing the full HP-GL interpreter. If I’m going to do that much work, I’d rather spend it on the HP-GL interpreter instead of the temporary hack job I’m only using to run some basic tests.
Setting up the Test
Up to now Scribble has been a self-sufficient machine that does not need any assistance from another computer. This is a good thing because my house is cramped with tons of space-filling junk everywhere. Just squeezing in the photography equipment is a challenge sometimes.
Unfortunately I now need to get a modern computer to talk to Scribble via the UART. I can’t move Scribble because any other room in this house is worse in terms of usable space. My laptop is large with a nonfunctional battery. My USB-to-UART cable is only.. let me check… just over 1m long. (It’s this one, if you’re curious).
Well, I guess I needed to clean up anyways. Not that I actually cleaned up much; there are still plenty of flat surfaces to dump random bits of junk on.

Since it’s so tough to get inside Scribble, I did most of the development work using this “simulator” circuit. Very helpful for catching issues that Atmel Studio couldn’t.
Also it fits on my laptop’s desk, which Scribble very much doesn’t.

A rare look behind the scenes. This is what I put up with to make this content.
On the plus side, that laptop is where I do all my programming work. Now I don’t have to run across the house, up and down the stairs, just to reflash the ATmega. I really need to set up a lab computer sometime.
Running the Test
Once again, I find myself needing to make video to demonstrate Scribble in motion. This time I sacrificed a 16GB SD card from my Raspberry Pi to get a decent length video. If only my camera wasn’t so shit…
Well, it’s not like I need ultra high res anyways.

I think we can safely call this a success!
Test Results
As expected, the test revealed some not-so-nice problems. Here’s a quick list of them. Well, the ones that aren’t caused by hasty hacked together test software.
All that vibration caused the carriage motor to shake loose. No wonder I kept having trouble with the carriage motion!

Turns out two tiny screws at the end of a vibrating cantilever is a recipe for shaking things loose.
An extra mounting screw fixed the issue. Hopefully for good.
You might notice that Scribble made dramatic pauses between strokes. That’s because the pen solenoid is too slow to keep up with the rest of the movement. I considered this problem, but didn’t expect it to be this slow. I “solved” the problem by inserting a long pause at the beginning of each instruction. I have a few ideas for fixing this properly, but I probably ought to focus on other stuff for now.
Speaking of the pen lift solenoid, I had to tweak it somewhat. While working on it I had to disconnect the little 3D printed lever that the solenoid pulls. I was not prepared for this:

This is a pretty embarrassing oversight. Solenoids easily get hot enough to melt PLA, and I never even considered that.
Solenoids get hot when working. Hot enough to make PLA soft. Couple that with violent up/down motion to get this modern art piece. Amazingly it still works just fine even though it’s all bent out of shape. My attempts to dynamically reduce the solenoid current don’t seem to be working. Another low-priority bug.
I continue to have problems with the carriage binding. I know for fact now that the guide rods are both bent, and quite dramatically too! Unfortunately I can’t replace them right now. I need to work on the carriage before that. The carriage itself is kind of a disaster that needs more than a minor rework; I want to completely replace it.
What’s Next?
Scribble is moving along much faster than I was expecting. I was anticipating a pretty long slog while I relearned how to write embedded C, along with some serious missteps. In practice though, this part went pretty quickly- just a few hours over a few days. It makes me excited to go further!
C is not a great programming language. Part of the reason this took so long is that I keep tripping over syntax issues. Maybe it’s just me, but C’s method of handling pointers is much more confusing than it seems like it should be. Much time was spent discovering the magic sequences of asterisks and ampersands that worked. I don’t know what I would do without Atmel Studio’s built-in simulator. Give up, probably. On the plus side, pointer shenanigans are mostly over now.
Technically, Scribble is now complete enough to qualify as a plotter. “Technically” is one of those slippery words that people use to pad out a weak-to-nonexistent argument. Scribble isn’t complete in my eyes until these two sub-projects are tied off:
- Finish the Pen Change Mechanism- Still working on it. Need to set up some equipment to cut the pieces. Other mechanical issues need attention too.
- Write the HP-GL Interpreter- Most of the ground work is done, so I expect this will come next. In practice, I probably need to do this before the pen change mechanism anyways.
After achieving these goals, Scribble will be ready for the Grand Finale. At the current rate that should hopefully be by July or August. Depending on how things go, I might try to squeeze a few extras in before then. Only if I have time though- I want to do other things this summer too. Beyond that, I’d like to polish up the less nice parts of Scribble as I’m able. You know, whenever I get around to it.
In my experience the hardest part of a project is the very beginning. When you don’t have any real results it’s easy to get discouraged. As soon as you get even one measly result, everything becomes so much easier. Projects get harder, projects get easier, but they tend to peak early.
Scribble is well over the peak now. I know for certain I am going to finish Scribble. 2023 continues to be my most productive year ever.
Have a question? Comment? Insight? Post below!